Rule 3 | Work with crossing lines
Lesson 1 | How to work with crossing lines
35 min.
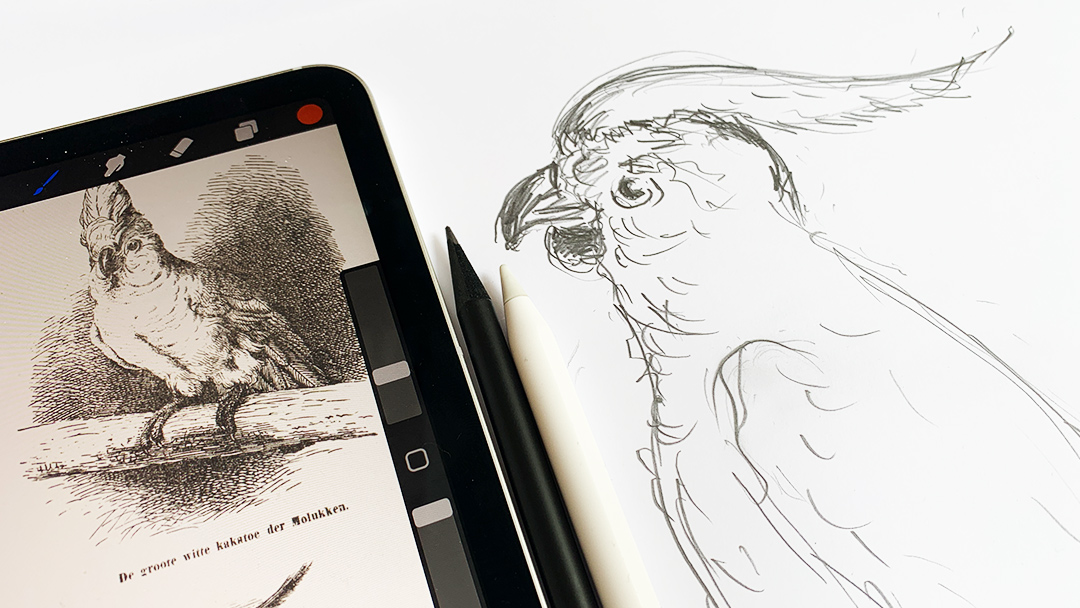
To capture the form we take the motif of the bird.
Step 1 | Lean back and look closer
We observe birds and sketch later like a pro
Fill your visual memory with images of birds and then, sketch them.
Script
We are working with the third rule. This means we are working with crossing lines to make it easier to find a form. I would like to introduce you to these birds. They are from Museum in Amsterdam. I downloaded them and they are available for you as well. I want to fill your brain with some images and visual information so that you afterward can draw more easily those birds. So let’s have a little bit closer look at this bird, maybe. What do we see? What do we know about the birds? Here we have the eye, we have some circles around the eye. We have the beak here. This is the upper part and the lower part. And we have some kind of a nose here. And then we have the head. And we have some feathers, kind of jewelry that he wears around it. There are some feathers around here that build the head and on the other side as well. Then we only see one wing. And here is the part of the head going over to the body. Here we do not see anything. This is left open. We will come to this later.
And then we have more feathers going behind this branch. And we only see the toes with the nails. Toes and nails. Toes and nails. We have a few contrasts here to depict the meridian line in the body. And for sure here we can feel the other part of the body’s end. Let’s go over to this bird. So this is kind of a silhouette from the side. We have again here the beak, the upper part, and again here, the lower part, difficult to detect. Then we have the eye with the reflection on it, by the way. So this is important. Then we have the other rounds around the eye. You have different feathers for the part that goes all from the nose or from the beak to the head. Then we have harnish with different feathers here. Many are many forms, many details, many strokes. Here we have all the details. And then we do not have a neck actually, but we have some feathers and a change of color or darkness of the feathers. And here we have this part that is kind of a chin or the neck here. And then we have the huge wings, very huge wings with those rhythms of feathers here. And other feathers on the lower part here may be a shoulder. Then the other part of the branch and the tail with the different feathers.
Let’s have a look at the feet. They are feathered as well. And we have toes, but no details. Just a little bit, no details. We even can’t see how they work together. I don’t know. We do not know a lot about this. We have an indication of the meridian as well. So the spine.
Here we have another bird, in a similar situation. Beak, the lower part of the beak, eye, and reflection. Circles around the eye. Lines that go rounds indicate with colors or darkness, that the beak is something else. And then other feathers that indicate the harnish on the head. We have a kind of neck. We have a body that goes over to the wings. And we have the wings here with different feathers, different feathers, different feathers. We have kind of a tail and we do not see a lot of the fingers or the feet of the bird. We do not see legs, not really.
We can see here the breast and. We can see that we have some feathers going around the head here, indicating where the head is finished and where the body starts. Here is another nice bird. Another perspective, is a more frontal perspective. Here. You see, it’s always nice to have information about the meridian. So meaning the part in the middle of the body, actually it’s introduced here as well. Then we have the beak again, all these feathers going away from the beak. Then these different parts of the harnish, big feather eye with a reflection, other circles around it, feathers that take up the form. And then we have the other feathers. That limits the head and blends it over to the body to the breast. A little bit of another wing here. I do not see the wing actually, but I see the body and the shoulder going over to the wing. But what I see here is a difference between the body and the leg. But here it’s not very specificated. Even here in the feet, not much specificated. A few toes, a few nails here, a few toes here, but not that much.
You see, I filled your inner brain with that visual information and actually, I want to get rid of this part of the information drawing. And I would like to draw a bird. Which part should I draw? What is compelling? What is a good situation? If I draw a bird that has a special appearance because it does something, maybe it is more difficult than if I take a bird that is in a normal position so that everybody knows, because you know it already. I want to trigger the images. But sometimes, why not, take a bird with a gesture that maybe gives me the impression that it wants to say something to me? So I take the easiest one. I think this is the one from the side.
When I draw it, I start at a specific point that is the main interest of the bird. I think it’s in the head. It’s very often in the head. If we draw a person sure, an animal for sure, it’s always the head. So shall I start with the beak or shall I start with the eye? I start with the eye and I start with little hints, where could something be? Only little marks that I give to the paper. I do not start with the whole of the eye because actually, I want to weave the face of the bird, and I do it with those small marks.
…
For the moment, this is, what I need. And now I’m ready. I feel well, this bird fits to my sheet of paper. Here are the wings. Here is kind of the beginning of it.
And now I’m ready for sketching. I just start at the same point, but I do real lines, and I really let the line flutter. I draw some lines. …
Okay, you see that I have woven now the bird, I started with some faint lines, and then I worked on it, and I even could work on more. But I think at the moment, this is it. You even see that I have very faint lines here that were totally wrong, but I just indicated a little bit, so I neglect them. So my brain actually doesn’t say, oh, well, this is the wrong line, so leave it like it is. Maybe here. This is not a nice or not beautiful line, but actually, if I have a problem that I have a longer line, I can just give a little bit of pressure on it, a little bit more black on it, and then the problem is solved. So I kind of can steer where the form is. I could work on it, even give more shades to it. But actually, at the moment, I think this is okay. So I think you have learned that you can really work with those crossing lines, finding shapes around the form, and enjoy drawing. I think it’s a beautiful thing to draw birds, because birds have many forms and we can really play around, and they are good forms to start with.
Happy sketching.

This is a nice drawing with some lines, that are reaching for the right form.
Kaketoe, Floris Arntzenius, c. 1883 – c. 1914

ASSIGNMENT | Draw some birds and try out even lines that freak out.
To upload, use the buttons further down.
Free trial
Try one lesson and decide if you want to do the whole course. Click for the free trial ...

Certificate
If you want to achieve a certificate that proves your sketching skills, get all your information here ...